Crystal... This word really reeks of magic. I don’t know about the magical properties of crystals, but they definitely have a variety of useful physical properties. Crystals are widely used in modern electronics, optics and other fields of technology. And, of course, the crystals are simply beautiful. They attract the eye with their regular shape and natural symmetry. Moreover, this applies not only to precious crystals, but also to crystals grown from improvised means.
We already know something about the crystalline state of matter from the article on. It's time to move on to practical exercises :)
The crystal growth experiment has a number of features. One of these features is the duration of the experiment. The point is that a good and beautiful, and, most importantly, large crystal cannot be grown quickly. This takes time. That is why the experience of growing crystals over nine days was developed in the section, where you could observe the progress of the process and, perhaps, even conduct your own experiment in parallel. This article is a generalization of the information obtained during the experiment. So, instructions for those who want to grow a crystal themselves.
For this we need:
- The container in which the crystal will grow. It is best if the container is transparent, for example, a glass jar. In this case, it will be convenient to monitor the progress of the process.
- A small piece of cardboard to cut out the lid for the container
- Funnel
- Filter paper or any material with which you can filter the solution. You can use a napkin.
- Thread. It is better to take a thinner and smoother thread, for example, silk.
- And, of course, the substance from which we will grow the crystal. Copper sulfate is used in the experiment. The crystal from it should turn out to be a beautiful blue color. In addition, it is quite easy to get copper sulfate - it is usually sold at any gardening store. If you were unable to find copper sulfate or are simply too lazy to go to the store, then you can use any crystalline substance, for example, ordinary table salt or sugar.

Before starting the experiment, I must warn you, in case you want to repeat it, about personal safety measures. You will be working with chemicals that may be harmful to you. Do not use food containers for your experiment, use protective equipment (gloves, goggles), and wash your laboratory glassware thoroughly. If chemicals come into contact with your skin or eyes, rinse thoroughly with water. If ingested, consult a doctor.
Well, the formalities are over, let's get started.
Day 1.
As I already said, growing crystals is a procedure that has some peculiarities. Another feature of this experiment, in addition to its duration, is the need to grow the so-called seed, i.e. a small crystal from which a larger crystal will grow. You can do without a seed, but in this case it is difficult to grow a beautiful single crystal. Therefore, it is better to grow the seed, especially since there is nothing complicated about it.
Let's prepare a saturated solution.
Let's pour a little copper sulfate into a glass container (hereinafter I will talk about copper sulfate, since it is what is involved in the experiment; you use the substance that you managed to find).

Pour the salt (copper sulfate is sulfur-copper salt) with a small amount of hot water. The use of hot water is mandatory, because... At elevated temperatures, the solubility of salts increases.

It is better to place the container in a water bath so that the solution does not cool ahead of time.

Stir the salt until it dissolves, then add more salt and stir again. We repeat this until the salt stops dissolving in the water.
Thus, we have obtained a saturated salt solution.
Now the resulting solution needs to be filtered. This must be done so that no foreign particles, such as dust or impurities, remain in the solution. Foreign particles can serve as additional crystallization centers, i.e. other crystals will begin to form around them, but we don’t need that. At this stage of the experiment this is not very critical, but later the purity of the solution will be very important.


After filtering, you need to throw a few salt crystals into the solution - seeds will begin to form on them.

Now the container needs to be placed in a place where a more or less constant temperature regime will be ensured (a window sill is great for this), and covered with something to prevent foreign impurities from entering.

The solution will begin to cool and become supersaturated, i.e. salt will begin to become more in solution than it can dissolve at a given temperature. The salt will begin to crystallize, and the crystallization centers will be those grains of salt that we added to the saturated solution. You will need to wait 2-3 days. After this, we will proceed to the next stage of the experiment.
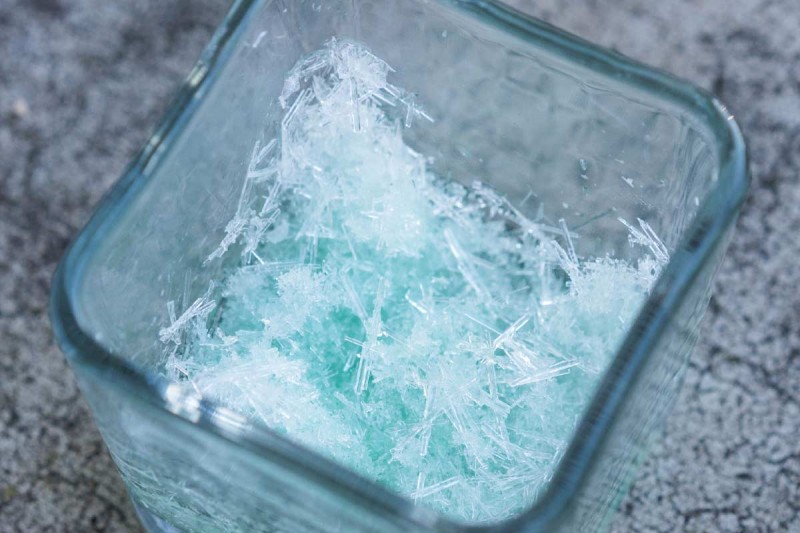
Day 2.
It can be seen that crystals began to form at the bottom of the vessel.

Day 3.
The crystals have grown. In principle, they are large enough to use as seeds, but I will try to keep them for another day.

Day 4.
Well, enough time has already passed, and we have formed good material for seeding. All that remains is to choose a suitable candidate.

Already quite beautiful, isn't it? But we will not stop there and will continue our experiment.
At first glance, it seems that the resulting mass of crystals is a monolith, but in fact, separating the crystals is not particularly difficult.

Try to choose a crystal of the most correct shape. I chose not the largest one available, but I liked its shape the most. The more correct the shape of the seed, the more correct the crystal shape will be in the future. To make the size of the seed more clear, I put a match next to it.

Now you need to tie a thread to the seed. As I wrote at the beginning of the article, it is better to take a thread that is less fluffy so that side crystals do not form on its protruding fibers. Do not use wire as a hanger.

Now the thread with the seed needs to be threaded through the lid of the container and secured on the back side. You need to secure it in such a way that you can adjust the height of the suspension at any time. For example, you can wind excess thread onto a match from the reverse side or secure the thread with a paper clip.

Now we need to prepare a fresh salt solution. It is done in the same way as for seeding: dissolving salt in hot water until it stops dissolving, filtering the solution. We place our seed in this fresh solution. Make sure that the seed does not touch the bottom and walls of the container, otherwise the crystal will begin to grow in an irregular shape.

And now we have two options. The first one is more complex. It requires more attention and effort. The fact is that the most beautiful and regular crystals are obtained when the crystallization process is slow. Therefore, we need to ensure smooth cooling of the salt solution. To do this, we need to place our container with the seed in thermal vessels and constantly monitor the temperature of the solution. In simple terms, there is quite a lot of fiddling around. But the reward for such efforts is worthwhile - the crystal will turn out to be as pure and correct in shape as possible.
The second way is much simpler. You placed the seed in a hot solution and can forget about it for a while, leaving the crystallization process to chance. With this method, the growing crystal may not have an ideal shape, but the growth process will be faster.
I chose the second path. In the end, having followed a simpler path and gained some experience, I can always do a more complex version of the experiment. In addition, you need to keep in mind that a quick version of the experiment does not mean that it can be completed in a couple of hours. Even with accelerated experimentation, the crystal will grow for several days. In the case of a long-term option, the experiment can last for 1 – 2 months.
But in both cases, you need to monitor the growth of the crystal. There is no need to take out the crystal and touch it again - this may affect its shape. If side crystals begin to form on a crystal or thread, they must be carefully removed so that they do not spoil the shape of the main crystal.
And one moment. If you put a seed into the solution, and it does not begin to increase, but quite the opposite, it dissolves, then this means that you have prepared an unsaturated solution. The solution preparation procedure will have to be repeated.
So we continue to monitor the growth of the crystal. If you have any questions, you can contact me in the comments or through the form.
Day 5.
Over the course of a day, the crystal grew significantly. The photo shows a crystal in comparison with a match and a crystal - a duplicate seed, which I left yesterday just in case.

However, as you can see, the crystal shape is not ideal; there are many defects. This is the result of rapid crystal growth. But I still like him :)
I refreshed the solution as I had done before and dropped the crystal into it again. Since the dimensions of the crystal increased significantly compared to the previous day, it was necessary to adjust the height of the seed suspension. The experiment continues.
Day 6.
Crystal has grown up. I renewed the copper sulfate solution again.

Day 7.
The crystal barely fits into my glass! Don’t forget to clean the thread from growing small crystals.

Day 8.

Day 9.
Well, here comes, I believe, the last day of the experiment. The latter is not because the crystal will not be able to grow further, but because it has become a little cramped in my laboratory glassware. We take out the crystal, cut the thread to the very root and blot it with napkins. We are one step away from admiring our work of art. The fact is that if you leave the crystal as is, it will soon collapse. To prevent this from happening, it needs to be “dressed” in a protective shell. The best option is to cover it with clear varnish. You can also place it in a hermetically sealed container, for example, a jar. But it seems to me that the best option is to cover it with varnish. This will give it additional shine, and it will be possible to observe it, as they say, live, and not through glass.

Now you can take a good look at the crystal. Of course, its shape was not ideal. But I deliberately chose the fast path of crystal growth instead of the high-quality one. In any case, I was pleased with the result. In nine days, the crystal grew more than seven centimeters in length - quite a good result!

I even wanted to give it a name. They give names to large and unique precious stones. For example, how the famous diamond was given the name “Count Orlov”. My crystal, of course, is far from a diamond, but it is dear to me in its own way :) Therefore, not without a bit of humor, I decided to call the resulting seven-centimeter pebble Baby.
Good luck with your experiments!


Reading time: 7 minutes
Growing a real crystal is quite simple, interesting and educational. This article talks about how to do this at home.
Crystals are formed from any substance whose atoms and molecules are grouped into an ordered structure. To grow them, you don’t need a laboratory or special equipment. The simplest reagents that are always at hand will do.
Crystal Growing is one of the easiest and safest chemistry experiments available at home. Even a child of primary school age can carry it out under adult supervision.
The reward for your efforts will be an object of extraordinary beauty that you create with your own hands.
Types of crystals
- A monocrystal is a single large crystal, for example, an artificial stone. It is formed under the condition that crystallization processes occur extremely slowly.
- A polycrystal is formed when crystallization occurs quickly. In this case, many tiny crystals are formed. This is how metals behave.
Ways to grow crystals at home
One of the simplest ways to grow a crystal is to cool a saturated solution. What processes occur in this case?
- In warm water, the substance chosen for the experiment (for example, salt) dissolves completely.
- The temperature of the solution is lowered: this reduces the solubility of the salt. Undissolved salt is formed and precipitates.
- The formation of a precipitate begins with the formation of small grains both in the solution itself and on the surface of the container in which it is placed.
- If there are no foreign inclusions in the solution (ordinary specks of dust, fluff, etc.), and cooling occurs gradually, these grains-crystals grow together into larger and more regular crystals.
- Rapid cooling causes the formation of many tiny crystals of irregular shape at once, which do not connect with each other and inhibit each other’s growth.
The crystal will also grow if the solvent (water) is gradually removed from the saturated solution. How to do this and what will happen in the vessel?
- Dishes with a saturated solution must be kept for a long time at a constant temperature.
- It is necessary to exclude the entry of litter and dust, and also slow down the evaporation of water (to do this, just cover the container with paper).
- You can grow a crystal on some kind of suspension in the middle of the container (then it will take on the correct shape), or on the bottom of the container.
- If the crystal grows on the bottom, it must be rotated periodically to achieve symmetry.
- In place of the evaporated water, add a solution of the same consistency as at the beginning of the experiment.
The basic principle in this case remains the same: the slower the processes affecting crystallization, the more beautiful, larger and more regular the crystals will be. If the original crystal which acted as the basis for growth was of an irregular shape, it will complete the missing parts as it grows and assume a configuration typical of the nature of its substance. So copper sulfate will eventually grow into a rhombus, and chromium-potassium alum salts will form an octahedron.
It is believed that only a small crystal can grow at home from improvised means. This is not so: with due attention, there is every chance of growing a crystal of any size and weight at home. In fact, to do this, it is enough to continue the crystallization procedure until the desired result is achieved. Of course, you must immediately select a container that is suitable in size.
Safety of crystals
Failure to comply with storage conditions may lead to destruction of the crystal. It is necessary to familiarize yourself with the characteristics of the selected substance in advance in order to avoid disappointment at the end of such long and painstaking work.
Thus, the chiseled edges of an alum crystal under the influence of ordinary dry air will fade due to loss of moisture and crumble, forming a gray powder. The same will happen with sodium sulfate and thiosulfate, manganese, zinc, nickel salts, and Rochelle salt. The only way out is to place the crystals in sealed transparent vessels. Some recommend covering the crystals with a clear varnish, but this only delays the death. Also, varnished edges lose their original shine and look artificial.
High temperatures destroy crystals grown from copper sulfate and potassium alum. The lifespan of such crystals can be extended by storage in a household refrigerator. However, even here they will last about 2 years.
Another problem with crystals of water-soluble substances is that they are destroyed by temperature changes due to moisture, which remains in small quantities inside them. For this reason, spots appear, chips appear, edges fade, and loss of shine occurs.
Perhaps the most stable substance popular for growing crystals is table salt.
What can you grow a crystal from in 2019?
In addition to the above substances, crystals can be grown at home from sugar.
It is much more difficult, but at the same time more interesting, to grow artificial stones (amethysts, quartzites, rubies, etc.). This is a rather labor-intensive process that requires special equipment to maintain constant temperature, pressure, humidity and other indicators important for the success of the experiment. In other words, to obtain an artificial stone, you will need a real laboratory.
What should be the substance for growing a crystal at home?
- Safe, non-toxic. Not all substances with a crystalline structure meet this requirement. For example, potassium cyanide KCN (or sodium sulfide Na 2 S) also forms crystals of its characteristic shape. But it is impossible to conduct experiments with it at home, because it enters into an oxidation reaction with oxygen in the air and releases toxic substances that are dangerous to humans.
- The second important quality is stability. That is, the selected substance must enter into a reversible reaction with water. In addition, resistance to temperature fluctuations is important. Some organic substances can be irreversibly destroyed when exposed to hot water (hydrolysis reaction).
- Cost of reagents. As you know, the first experiment (or several) may not be very successful, so to begin with it is better to opt for inexpensive and accessible substances.
- Yes, growing crystals will require a lot of purified water - this should also be taken care of in advance.
- Ability to dissolve in water. Before starting the experiment, you should find out what consumption of the selected substance is required for a given volume of water. To grow a sugar crystal, for example, you will need to dissolve at least 2 kg of sugar in 1 liter of water. So it is better to first draw up a graph of the solubility of the starting substance. To do this, you need to subtract the mass of the same volume of filtered solution from the mass of a glass of water after the dissolution is completed and the temperature has stabilized. This will help you get an idea of how much crystallization substance is needed for a given volume of water.
How to grow a table salt crystal
The easiest way to practice is with regular table salt. Then you won’t need special chemicals, just salt and purified water.
Step 1. Prepare a crystal of salt by tying it with a thin thread secured in the middle of a small stick (pencil, pen).

Goal: place the crystal so that it is immersed in the solution, but not in contact with the surface of the vessel.
 We tie the salt crystal to a thread and place it in a glass
Step 2. Pour warm water into a container (transparent so you can observe the growth of the crystal) and add salt. Stir until the salt dissolves completely. Then add salt and repeat. It is necessary to salt the water until the salt stops dissolving. This is noticeable by the appearance of sediment at the bottom of the vessel.
Step 3. The solution must be gradually heated by placing it in a larger diameter container with hot water. Eventually the precipitate will dissolve. If there is something left at the bottom, it is better to pour the solution into a clean container.
Step 4. Place the container with the resulting solution in a place with a stable temperature. Immerse the crystal-nucleus on a string into the solution. The top of the vessel with the solution must be covered with paper.

Step 5. The crystallization process has begun. Next, when the water evaporates, it will be necessary to add to the container a solution with the same salt content as was at the beginning of the experiment. After some time, it will become noticeable that the original crystal has increased in size. You can grow it as much as you like, as long as you have enough container size and patience. The resulting crystal will be quite durable.
How to grow a sugar crystal
Sugar crystals can be used as table decorations or candy for children. But they are quite expensive due to the high sugar consumption. For 2 glasses of water you will need a total of 5 glasses of granulated sugar.
 Sugar crystals
The process of preparing the solution is similar to how it is done for salt crystals. The easiest way to grow sugar crystals is on toothpicks or wooden skewers. To “prime”, just dip a skewer in syrup and dip it in sugar so that it sticks evenly to the surface. You need to wait time for the sugar to stick well and dry.
To form colored crystals, you should add food coloring to the syrup (the best option is juice).
It will take 1 week to grow a sugar crystal from the specified amount of ingredients.
Sugar crystals on sticks (Video)
This video explains how to grow edible crystals from sugar that are not only beautiful to look at, but also very tasty.
How to grow a crystal of copper sulfate
Salt crystals turn out transparent white, and copper sulfate gives a rich blue tint.

Growing such a crystal is no more difficult than a salt crystal: you will need a saturated solution and a crystal embryo on a string.
 Crystal of copper sulfate suspended on a thread

The solution in a transparent container must be placed in a shaded place with a stable temperature, hang the crystal as in the case of salt, and wait, periodically adding the solution to replace the evaporated one.

You cannot remove the crystal from the working solution until the procedure for its formation is completed!
Safety precautions
Food containers should not be used to grow crystals (with the exception of experiments with salt and sugar). You should not leave food nearby: firstly, because the reagents are toxic, and secondly, because of debris and crumbs, which, if they get into the solution, will ruin the experiment.
When manipulating chemical reagents, you must follow absolutely all the rules indicated on the packaging. Upon completion of work, you should wash your hands.
Growing a crystal at home is quite simple, interesting and educational. First, it is better to practice on available substances. If something goes wrong, you need to check that all the conditions necessary for the formation of a crystal are met. Having mastered the simplest crystals, you can begin to work with other reagents. It never gets boring because different substances produce crystals of different shapes and colors. In addition, no two crystals are exactly alike, and their configuration and size can be adjusted at will.
Tipone- In contact with
- Google+
Crystals look attractive, attract the eye and fascinate. Gemstones used in jewelry are mineral crystals.
Crystals of natural mineralsThanks to modern technology, people have learned to grow such beauty on their own, and synthetic gemstones are difficult to distinguish from crystals of natural origin. Table salt can also grow in the form of crystals. To see this, let's look at ways to grow salt at home.
Materials for growing salt
To grow a salt crystal, prepare an appropriate solution and special dishes. The process itself will take several months, so you will have to be patient. The growth of a salt crystal is affected by air humidity, room temperature, solution saturation, and the type of salt used. To successfully complete the experiment, you will need the following components:
A container made of material that is not capable of oxidation in salt water (a glass jar will do);
Table or sea salt;
Funnel;
Copper wire or thread;
Napkins or filter paper;
Wooden or glass rod for stirring the solution.
 Table salt crystals
Salt growing process
- Pour distilled water into a container and add salt. Salt must be added until mixing becomes difficult.
- Place the resulting mixture in a water bath and wait until the salt is completely dissolved in the water.
- Strain the solution through filter paper or a napkin into a prepared jar.
- Tie a small salt crystal to a thread and lower it into the cooled liquid. Tie the second edge of the thread to a stick, the length of which is greater than the diameter of the neck of the jar. The stick will help secure the thread with the crystal, which is constantly suspended.
- Cover the resulting structure with a piece of cloth or a napkin, then place it in a place with the least temperature changes.
- During the experiment, you must not touch the jar, move or pull the thread with the crystal. The structure must remain motionless.
- After 4 weeks, the crystal will increase to the size of a bean; after 8 weeks, the diameter of the stone will reach 4 cm. If you need a larger salt crystal, you will have to wait a few more months.
- Carefully remove the finished crystal of the required diameter from the jar and wipe with a napkin. To protect the crystal from external damage, it is recommended to coat the stone with clear nail polish.
- After the varnish has dried, you can admire the salt crystal.
A blue crystal is grown in the same way - for this, blue food coloring is added to the solution.
 Blue salt crystals
How to grow a white crystal from sea salt
To create a white sea salt crystal, you will need the materials described above. The process of growing salt occurs as follows.
- Prepare a saturated saline solution in a glass container. Add 40 g of sea salt to 100 g of hot water and stir the solution until the salt dissolves.
- Cool the resulting liquid, then filter.
- Let the solution stand for several hours, then filter again.
- Attach a large grain of sea salt to a copper wire and lower it into a container with a solution so that the crystal does not touch the bottom.
- Cover the jar with a sheet of paper to prevent foreign objects and dust from getting inside.
- After two days, carefully remove the wire with the crystal, move it into another vessel and pour the solution into it.
- Once a week the liquid is filtered.
- After a few days, the growth of the salt crystal will become noticeable. You can grow the stone until a crystal of the required diameter is formed.
A stone grown from salt is characterized by increased fragility and fragility, so you should not hold it in your hands for no reason. After varnishing, it is recommended to store the crystal in a closed container to avoid damage. Using the described methods, you can grow many salt crystals of different colors at home, using brightly colored food colors when preparing the solution. To find out what other crystals you can grow at home, click
Crystals surround us everywhere. We eat them, walk on them, and use them to make various tools and appliances. You can conduct an interesting experiment and grow them at home. Look at the photos of homemade crystals, you can get large and small, transparent and colored specimens. It all depends on your desire and patience.
Salt crystals
You can involve children in a simple experiment. All you need is salt and water. There is no need to use additional reagents, so it is a safe process. This is a fascinating activity; every day you can watch how the crystal gradually increases in size.


Preparing for the experiment
Before starting work, decide on the location where the container with the crystal will be located. During growth, do not move or tilt the dishes. It is better to take sea salt, as it does not contain foreign impurities.

Take distilled water or boil it and filter it. You can also use regular table salt for the experiment.

Do not pour the solution into metal containers. Novice researchers are interested in what crystals they can make themselves.

The size of the crystal depends on the duration of the experiment and the volume of the container. The base used is thread, wire, twigs or a piece of salt.

Growing
Take half a glass of water and pour it into a saucepan. Then the dishes are placed on the fire and brought to a boil. Let's look at what you can grow crystals from at home.

It will take several days to form a craft from table salt. Sea salt forms a crystal in 2 days. If you choose iodized salt, you will have to wait a long time for the results.

It is necessary to prepare a saturated solution. Add salt to warm water until it stops dissolving. We prepare the thread for the warp and tie a small crystal of salt to it.

The rope should not touch the bottom or walls of the container. The second end of the thread is tied to a pencil, which is placed on top of the container. Now we need to watch the growth.

Sugar crystals
Sweet and colorful products will delight children. To get them, just use the instructions for growing crystals at home. For the experiment you need 2 glasses of water, 5 glasses of sugar, wooden skewers, a saucepan, transparent containers, paper.

First of all, prepare the sugar syrup. It will require a quarter glass of water and two tablespoons of sugar. Place this mixture in a saucepan on the fire.

After this, dip the skewers one by one into the syrup and then sprinkle with sugar. The preparations must be thoroughly dried, it is better to leave them until the morning.

Growing process
Pour 2 cups of water into the pan and gradually add 5 cups of sugar. Stir the solution constantly. If the sugar has completely dissolved, remove the syrup from the heat. Leave it for 15 minutes to cool. Cut out circles from paper. They must be larger than the diameter of the containers.

To figure out how to properly grow crystals with your own hands, you need to carefully study the sequence of actions. This will help you get the desired result.


Pour the cooled syrup into glass containers; you can add food coloring to them. Then blanks with paper circles on them are lowered into glasses. The skewers should not touch the bottom or walls. It will take a week to grow sweet crystals.

Note! 
Copper sulfate crystal
This experiment requires strict adherence to safety precautions. We will need water, a glass container, and copper sulfate. You need to purchase a homogeneous bright blue powder in the store. Pour 100 g into a jar and add hot water, stirring constantly. We get a saturated solution, filter it and put it in the refrigerator.

The next day, select the largest crystal, fasten it to a thread and place it in a jar with a filtered solution.

The container must be covered with paper to prevent dust from getting in. The growth process lasts several weeks. Afterwards, take out the crystal and cover it with colorless nail polish.

Conclusion
Growing crystals is a fascinating process. To get excellent results, it is important to follow the technology. To practice, you can buy a special kit for growing crystals at home. You can try sweet products at home tea parties.


At a certain point, the crystals stop growing. You can finish the experiment here, or prepare a saturated solution again and drop the crystal into it. He will grow even more. Growing crystals is an interesting and educational process.

Photos of crystals at home

Note! 


Note! 


If you are drawn to chemistry or you have a restless child at home who you want to occupy with something interesting, then the technology of growing a crystal is simply created for you. Read about how to grow a crystal at home from salt in our article with photos!
Set of ingredients
Growing is a long process, but as a result you will get an amazing natural crystal that will take its rightful place on your crafts shelf.
To grow we need the following ingredients:
- table salt
- a lot of patience

To make a beautiful crystal, use purified water, because it does not contain chlorine and other harmful impurities.
Crystal Growing
Answering the question of how to grow a crystal at home from salt, it is worth saying that the work begins with preparing a saline solution:
- take a glass of water and pour it into a small container
- Place the poured water into a larger container and add water at a temperature of 50-60 C.

To obtain a liquid of the required temperature, mix half a glass of boiling water with a glass of water at room temperature.
- Now add 2-3 tbsp. l. salt into a small container, stir and leave for 5 minutes so that the salt particles dissolve in the water. Dissolution will occur by heating the water in a small container.
- Next, you need to add 1-2 tbsp into a small container every 5 minutes. l. salt until the sodium chloride stops dissolving.

After 2-3 additions, sodium chloride will no longer dissolve in water. It’s time to pour the resulting concentrated saline solution into a small container. During transfusion, make sure that undissolved crystals do not penetrate into the new vessel.
Selecting the main crystal
After preparing the saline solution, select a large crystal from the bag with ordinary salt, and then lower it to the bottom of the container with the concentrated liquid. That's it, all that remains is to send the future crystal to the windowsill and watch its growth, which can last several weeks.

If you want to speed up the growth of the crystal, then after 3-4 days you can carefully remove it from the container, and then prepare a new solution. The procedure will significantly speed up the growth of the crystal, because it will receive new material for increasing volume. But such actions can destroy the crystal, so it is better to simply add a little saline solution every 2-3 days as the liquid evaporates.
How to grow a crystal from sodium chloride?
When answering the question of how to grow a crystal at home from salt, it is worth talking about a number of factors that influence the final shape of the salt product:
- If you lower a string to the bottom of a jar with a crystal, the crystal will form around this makeshift support. To create a support in the middle of the pencil, tie a string and lower it into the solution. Everything, the salt particles will find support on their own.
- If you quickly cool the saline solution, the crystal will form faster, but its shape will not be beautiful. With gradual cooling of the liquid, the formation of the crystal will take longer, and the shape will be perfect.

- Do not shake the jar with the crystal so as not to disturb its formation.
- Do not add dyes to the salt liquid, as they will only slow down the formation of the crystal.
- After making the crystal, you can use it to decorate your interior, because salt absorbs foreign odors, harmful fumes and radiation from electrical appliances!
